Assembling ChibiStudio from scratch
About
Recently I had to assemble ChibiStudio for Windows from scratch and I decided to write down a simple to-do list to be consistent over time. Looking back at the list, it was so detailed I start to think about an article to share this experience and enable everyone to assemble their own environment and maybe get feedback from experts out there and improve our process.
Premise
The need for an IDE
ChibiStudio was an idea by Giovanni (the creator of ChibiOS) to enable the community to easily ramp up with ChibiOS. It’s basically an ensemble of free and open-source software and some custom configurations.
When I had to take over this process I was pointed to the “Elder Scroll”, an article from the old wiki of chibios.org written in 2008 and later updated in 2012 but now discontinued. Even if aged, the article still provided some references.
The path constraint
If you ever installed ChibiStudio on Windows, you will surely remember that you need to extract it having its root folder located at C:\ChibiStudio. This constraint comes from some hard-coded configuration in the Eclipse file that cannot be modified programmatically: for some of them, you need to do some specific procedure from Eclipse’s GUI.
If you are going to create your own ChibiStudio setup, decide the location of your toolchain before starting the procedure because it would be complicated to relocate it afterward. from here and out we will refer to this location as [ChibiStudio root]
A small side note, I actually created a semi-automatic mechanism that allows relocating your ChibiStudio setup but I will talk about that in another How-to.
Let us start
Eclipse installation
ChibiStudio is built starting from Eclipse IDE for Java Developers and subsequently extended with the C/C++ Development Tools. The Java version comes with some features that ChibiStudio uses to generate the board files. Picking up the version for C/C++ Developers you need to install and configure more things.
Nowadays Eclipse comes with an installer we strongly discourage it in this case because the setup is not portable. My suggestion is to pick up the package from here.
Differently from the past Eclipse now includes directly Java. So now you just have to download Eclipse IDE for Java Developers 2022-12-R and extract it in the directory [ChibiStudio root]/eclipse
Installing Eclipse additional packages
Launch eclipse from [ChibiStudio root]/eclipse/eclipse.exe. At the first launch, he will ask about a workspace: it’s time to prepare things for a later step: choose the folder of your final workspace and check “Use this as the default and do not ask again”

In my case, I am preparing the Workspace User that would be later finalized and duplicated to create all the additional workspaces released with ChibiStudio. The next step is to install all the required packages to Eclipse.
Go in the dropdown menu Help -> Install new Software
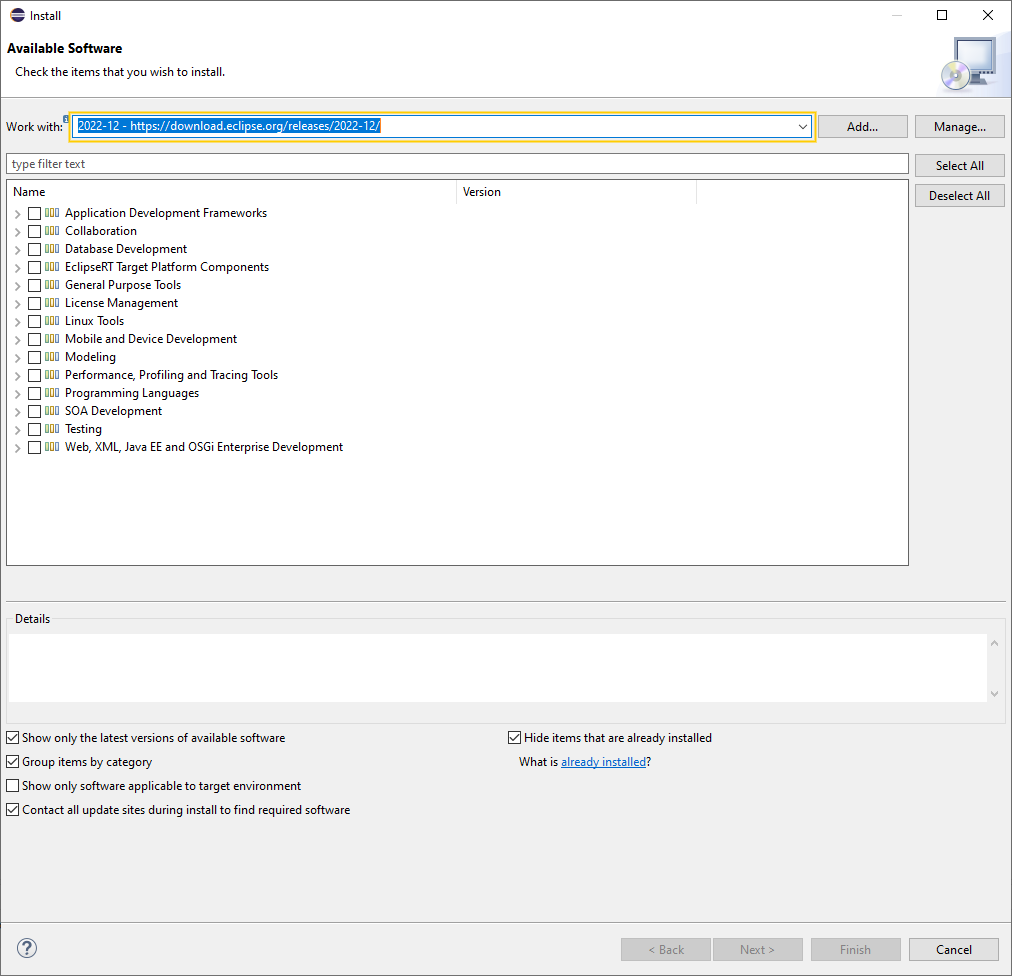
Select the repository associated with your release (in my case 2020-03 – http://download.eclipse.org/releases/2020-03) and install the following packages:
- General Purpose Tools -> TM Terminal Serial Connector Extensions
- Mobile and Device Development -> C/C++ GDB Hardware Debugging
- Mobile and Device Development -> C/C++ Memory View Enhancements
- Programming Languages -> C/C++ Development Tools
- Web, XML, Java EE and OSGi Enterprise Development -> Eclipse XML Editor and Tools
- Web, XML, Java EE and OSGi Enterprise Development -> Eclipse XSL Developer Tools
We now need to add some new repositories:
- ChibiStudio – http://chibios.org/eclipse/chibistudio_new
- EmbSysRegView – http://embsysregview.sourceforge.net/update
- Freemarker – https://ddekany.github.io/jbosstools-freemarker/updates
- Plant UML – http://hallvard.github.io/plantuml/
We now need to install some extra plugin
- ChibiStudio Eclipse Compontents -> ChibiOS Eclipse Tools from ChibiStudio
- embsysregview -> Embedded System Register View (SFR) from EmbSysRegView
- embsysregview -> EmbSysRegView Data from EmbSysRegView
- FreeMarkerIDE-> FreeMarkerIDE
- FreeMarkerIDE -> FreeMarkerIDE Source
- FreeMarkerIDE -> JBoss Tools Freemarker Tests
- FreeMarkerIDE -> JBoss Tools Freemarker Tests Developer Resources
- PlantUML Eclipse support -> PlantUML Ecore Feature
- PlantUML Eclipse support -> PlantUML Feature
Finally, as we are using ChibiStudio to prepare even the ChibiOS Debug View plugin we use to install another plugin from The Eclipse Project Updates
- Eclipse Plugin Development Tools -> Eclipse Plug-in Development Environment
Tools preparation
The next step is to set up the tool folder. This folder is [ChibiStudio root]/tools
Adding GCC for ARM
We usually add the latest version and the previous version of GCC for ARM from here under the folder [ChibiStudio root]/tools/GNU Tools ARM Embedded/[version]. For example, while building ChibiStudio 2023-02, I added 10.3 2021.10 and 11.3 2022.08
The reason for the second compiler is that in the past, it happened that the latest version of GCC suffered some bugs for some specific architecture. So we usually prefer to bring in, together with the latest version, also the version we largely used in the previous release of ChibiStudio.
For every version of GCC you need to do a small edit: copy .\bin\arm-none-eabi-gcc-x.x.x.exe as .\arm-none-eabi\bin\gcc.exe
Adding msys2
This could be tricky because there is no simple way to list all the msys2 programs that you need and it is definitely overkill to dump the entire msys2 in ChibiStudio. I have a list of tools and related dependencies you do need for ChibiStudio that you can copy directly from your msys2.
The root folder is [ChibiStudio root]/tools/msys2/. Here you do need to create two folders usr and tmp. Finally, this is the list of tools I added to the latest version of ChibiStudio in [ChibiStudio root]/tools/msys2/usr/bin.
17.08.2021  15:32           632.832 awk.exe
17.08.2021  15:32            33.859 basename.exe
17.08.2021  15:32         2.201.842 bash.exe
17.08.2021  15:32            37.695 cat.exe
17.08.2021  15:32           111.647 cp.exe
17.08.2021  15:32            32.782 dirname.exe
17.08.2021  15:32            34.731 echo.exe
17.08.2021  15:32                28 egrep
17.08.2021  15:32                28 fgrep
17.08.2021  15:32           287.353 find.exe
17.08.2021  15:32           209.682 grep.exe
17.08.2021  15:32           201.124 make.exe
17.08.2021  15:32            69.421 mkdir.exe
02.07.2021  10:25         3.609.331 msys-2.0.dll
12.04.2021  23:29            40.313 msys-crypt-0.dll
26.10.2020  15:25            72.966 msys-gcc_s-seh-1.dll
20.12.2020  17:37           581.162 msys-gmp-10.dll
08.09.2020  18:20         1.023.499 msys-iconv-2.dll
31.05.2017  12:56            43.904 msys-intl-8.dll
17.07.2020  08:46         2.717.824 msys-mpfr-6.dll
17.02.2020  08:44           310.530 msys-ncursesw6.dll
18.06.2021  22:00           286.198 msys-pcre-1.dll
23.03.2021  00:23         3.390.663 msys-perl5_32.dll
25.07.2021  23:10           263.878 msys-readline8.dll
17.08.2021  15:32           117.888 mv.exe
17.08.2021  15:32            14.391 perl.exe
17.08.2021  15:32            62.343 rm.exe
17.08.2021  15:32            59.687 rmdir.exe
17.08.2021  15:32           169.392 sed.exe
17.08.2021  15:32         2.201.842 sh.exe
17.08.2021  15:32            34.467 sleep.exe
17.08.2021  15:32            38.316 tee.exe
17.08.2021  15:32           104.903 touch.exe
17.08.2021  15:32            33.828 uname.exe
Adding the OpenOCD
Download the latest version of OpenOCD that I periodically build from the download page of this website or eventually build your own by looking at Building OpenOCD under Windows using MSYS2.
Add OpenOCD under [ChibiStudio root]/tools/openocd checking that openocd.exe is located at [ChibiStudio root]/tools/openocd/bin/openocd.exe
Adding ChibiStudio tools
We now need to add some additional tools for ChibiStudio in [ChibiStudio root]/tools/chibistudio/. We have to add basically only the folder
https://sourceforge.net/p/chibios/code/HEAD/tree/branches/chibistudio_trunk/tools/makelaunch/
Adding ChibiOS
Add the latest stable version of ChibiOS. You can download it from the ChibiOS official release page on Sourceforge or directly check out from the SVN repository. There is a stable branch for each release. For example, the branch of ChibiOS 21.11.x is at
https://svn.code.sf.net/p/chibios/code/branches/stable_21.11.x.
We usually add the latest stable releases (the zip file instead of the SVN repo) and the latest snapshot of the trunk from https://svn.code.sf.net/p/chibios/code/trunk. For every ChibiOS release added we create an additional workspace.
For example, ChibiStudio 2022-02 comes with
- ChibiOS 20.3.4 “Conca”
- ChibiOS 21.11.3 “Montepertuso”
- ChibiOS trunk r16117
Creating the launchers
For every GCC version, we need to create a launcher. The launcher is a batch file that temporarily sets some variable
@echo off
set CHIBISTUDIO=%~dp0
set FMPP=%CHIBISTUDIO%\tools\fmpp\bin\fmpp.bat
set BASH=%CHIBISTUDIO%\tools\msys2\usr\bin\bash.exe
set OPENOCD=%CHIBISTUDIO%\tools\openocd\bin\openocd.exe
set JLINK=%PROGRAMFILES(X86)%\SEGGER\JLink\JLinkGDBServerCL.exe
set PATH=%CHIBISTUDIO%\tools\msys2\usr\bin;%PATH%
set PATH=%CHIBISTUDIO%\tools\openocd\bin;%PATH%
set PATH=%CHIBISTUDIO%\tools\GNU Tools ARM Embedded\11.3 2022.08\arm-none-eabi\bin;%PATH%
set PATH=%CHIBISTUDIO%\tools\GNU Tools ARM Embedded\11.3 2022.08\bin;%PATH%
cd eclipse
start eclipse.exe
Configuring the first Workspace
The next step is about configuring our workspace and testing our setup. Let us launch ChibiStudio through the launcher. This will configure the environment variables and make the IDE ready to perform the basic operations. Note that all the configurations we are going to apply in the next steps will be stored in the metadata of the workspace.
Here are the things to do
- add the perspectives C and Debug
- close the perspective Java
- disable all the Code Analysis options in Preferences > C/C++ > Code Analysis
- import the ChibiOS Style XML in Preferences > C/C++ > Code Style > Formatter
- in the C/C++ perspective
- Change the view of Project Explorer from hierarchical to flat in the three-dot menu > Projects Presentation > Flat
- Add PlantUML at the bottom
- Save the perspective as “C/C++” replacing the existing one (Windows > Perspective > Save as)
- in the debug perspective
- close the Project Explorer
- move the Debug window on top of the Editor
- close the Debug Shell
- from Windows > Show View open Registers, Memory, Disassembly, Terminal, EmbSysReg (under Other > Debug) and ChibiOS Debug View (under Other > ChibiOS\RT)
- move Registers in the top left window
- move Disassembly in the top left window splitting it horizontally
- save the perspective as “Debug” replacing the existing one
- Set C/C++ perspective as the default in Preferences > General > Perspectives
- In Preferences > General > Workspace check the box Refresh using native hooks or polling
- In Preferences > General > Workspace you need to add two linked resource
- CHIBIOS pointing to the release in use (e.g. C:\ChibiStudio\chibios203)
- CHIBISTUDIO pointing to you installation root (e.g. C:\ChibiStudio)
- In Preferences > General > Workspace choose Report missing project encoding as: Ignore
- In Preferences > C/C++ > Editor uncheck Report problems as you type.
- Import the demos you need from the ChibiOS release you intend to use within this workspace (they are under [chibios]/demos, [chibios]/testhal and [chibios]/testex)
- Import ChibiOS tools that are located in under [chibios]/tools
At this point, your setup should be ready to go. But we typically use to perform some optional additional operations
- We change the name of the workspace with the name of the current ChibiStudio version and the version of ChibiOS in use. This in Preferences > General > Workspace:
- Enable Show Name (e.g. “ChibiStudio 2023-02 – ChibiOS 21.11.x”)
- Enable Show full workspace path
- Disable Show Product Name
- Copy the Documents Project from an old workspace
- Copy and update the readme (C:/ChibiStudio/readme.txt)
- Import Documents
After testing the first workspace we also duplicate it for every release we have in ChibiStudio. Usually, we create the Workspace User first as it is the more generic and then we duplicate it 3 times (e.g. workspace216, workspace203, workspace_trunk)
For each workspace:
- import the demos from the right release
- update the linked resources changing CHIBIOS
- Update the name indicating the release of ChibiOS in use
Hello Sir,
I wanted to design small application on Chibios so to get knowledge of it. I am using Ubuntu so could you please help me how configure it on Ubuntu. What are the tools I required for configuration.
Thanks in advance!
You should replicate exactly the same steps. Unfortunately some part should be built at the moment: as example open ocd.
Nevertheless, here you can find a ChibiStudio for Linux as well a Mint based VM.
https://osdn.net/projects/chibios/
Respected sir,
1. I have gone through one of your explanation for error ‘Nothing to be done for all’ .You suggested to install tool chain properly. According to me the Linux version has already contains GCC ARM toolchain (various versions), OpenOCD latest from repository with patching, ChibiOS 19.1.x, 20.4.x stable, Eclipse 2020-03,ChibiOS trunk. So how to I make sure it is linked to my workspace.
2. When I copied demos from ChibiOS_stable-20.3x to workspace and tried importing from option ‘existing projects into workspace’ then I could not see the projects.
Please could you help me in this
Thanks!
Hello,
you do not need to move the project from the ChibiOS folder to the workspace folder to import them… There are some configuration stored inside the workspace so you would definitely start from the Workspace-user to create your own.
The guide here explains everything about the workspace configurations.
You would look here for the project import:
https://www.youtube.com/watch?v=HYqllbWUy1k
Hello Sir,
I refer the video which is mentioned in the above link. I did the same steps to import the project. But when I do it then I cannot see the debug folder inside the projects.
Hi Rocco,
Excellent detailed article!
Just went through and installed to my portable drive, and would like to add some notes:
As of Eclipse version 2020-09 it requires Java version 11, unfortunately Oracle changed it license terms for Java, so I choosed Azul Java instead. To make it portable, created a java folder inside D:\ChibiStudio and extracted the zip (zulu11.41.23-ca-jdk11.0.8-win_x64.zip). In eclipse.ini had to add the following line: -vm D:/ChibiStudio/java/bin/javaw.exe (before -vmargs).
Just a side note, I use high dpi monitor so I added -Dswt.autoScale=200 (after -vmargs in eclipse.ini) to enlarge text and icons in Eclipse.
What was missing from your documentation is to setup (import) External Tools configuration (OpenOCD launch configs) so I extracted from official ChibiStudio and imported to Eclipse ( File -> Import -> Run/Debug -> Launch Configurations )
For convenience here is the extracted launch configurations:
https://mega.nz/file/l4BFSASS#Ol-y4BWDrZVUO2nxqWWeljLz9CQHPzr02SG19A1TfW8
Regards
Zoltan
Hello Zoltan,
thanks for sharing!
Hi.,
I want to create custom board of STM32F765II controller drivers. How can I generate the initial configuration file?
Thank You.,
Hi Karthik,
Copy the xml of a board with a similar board in your project, modify the xml, generate the board files and modify your make file to point to your files