
Is ChibiOS an RTOS or a HAL? Understanding the full picture
Introduction
ChibiOS is a powerful solution specifically designed for developing production firmware for various microcontrollers. It stands out in the open source community due to its ready-to-use formula and its composition of interconnectable, yet independent products. As subsystems are often used in together, it is pretty easy to confuse all of them under the name of ChibiOS and neglect that ChibiOS is way more than just an Operating System.
In reality the ChibiOS project is composed of many systems that can be combined together to fulfill the requirements of the user application. In what follow we are going to provide a picture of some of them and explain how they can be combine with each other.
RT and HAL: covering most of the applications
Two primary products that are often used together are ChibiOS/RT and ChibiOS/HAL. Even if used often in combination, it is important to note that we are talking about two fully independent products: ChibiOS/RT serves as the operating system, providing an API to manage multithreading, scheduling, time, and memory access synchronization. On the other hand, ChibiOS/HAL consists of a set of device drivers that offer a cross-platform API for accessing microcontroller peripherals in a straightforward manner. Together, these two components form a powerful combination to build efficient and reliable embedded applications.
ChibiOS/RT: the RTOS
ChibiOS/RT is the core of the ChibiOS embedded collection and it is commonly referred to as RT. It is a Real-Time Operating System (RTOS) specifically tailored for embedded applications with stringent time requirements. It simplifies the design of such applications by providing multithreading and a preemptive priority-based scheduler. This scheduler ensures that threads are executed based on their priority levels, allowing higher-priority threads to interrupt lower-priority ones when necessary. This feature makes ChibiOS/RT suitable for real-time applications that demand precise and predictable behavior. Moreover, the RTOS offers synchronization mechanisms like mutexes and semaphores, as well as virtual timers and asynchronous events to facilitate thread coordination.
Can ChibiOS/RT be used standalone?
Yes! To understand how it looks an example code solely based on ChibiOS/RT, we may look at the demo RT-ARMCM4-GENERIC
#include "ch.h"

#if !defined(SYSTEM_CLOCK)
#define SYSTEM_CLOCK 8000000U
#endif

/*
 * @brief   System Timer handler.
 */
CH_IRQ_HANDLER(SysTick_Handler) {

  CH_IRQ_PROLOGUE();

  chSysLockFromISR();
  chSysTimerHandlerI();
  chSysUnlockFromISR();

  CH_IRQ_EPILOGUE();
}

static uint32_t seconds_counter;
static uint32_t minutes_counter;

/*
 * Seconds counter thread.
 */
static THD_WORKING_AREA(waThread1, 128);
static THD_FUNCTION(Thread1, arg) {

  (void)arg;

  chRegSetThreadName("counter");

  while (true) {
    chThdSleepMilliseconds(1000);
    seconds_counter++;
  }
}

/*
 * Application entry point.
 */
int main(void) {

  /*
   * Hardware initialization, in this simple demo just the systick timer is
   * initialized.
   */
  SysTick->LOAD = SYSTEM_CLOCK / CH_CFG_ST_FREQUENCY - (systime_t)1;
  SysTick->VAL = (uint32_t)0;
  SysTick->CTRL = SysTick_CTRL_CLKSOURCE_Msk | SysTick_CTRL_ENABLE_Msk |
                  SysTick_CTRL_TICKINT_Msk;

  /* IRQ enabled.*/
  NVIC_SetPriority(SysTick_IRQn, 8);

  /*
   * System initializations.
   * - Kernel initialization, the main() function becomes a thread and the
   *   RTOS is active.
   */
  chSysInit();

  /*
   * Creates the example thread.
   */
  (void) chThdCreateStatic(waThread1, sizeof(waThread1), NORMALPRIO, Thread1, NULL);

  /*
   * Normal main() thread activity, in this demo it does nothing except
   * increasing the minutes counter.
   */
  while (true) {
    chThdSleepSeconds(60);
    minutes_counter++;
  }
}
Unlike other demos, this particular one does not involve peripherals (e.g. toggling GPIOs or writing to UARTs). Instead, it performs operations on variables and utilizes multithreading and to do so it initializes the core Systick peripheral without passing through additional APIs. As a result, this example showcases the capabilities of the RTOS without involving use of peripherals, even if it may not appear as the most impressive application.
The entire codebase of ChibiOS/RT is located in the root of the ChibiOS project under the path [chibios_root]\os\rt. It is possible to configure RT at the project level through the file chconf.h: this allows developers to customize its behavior based on their specific project requirements.
ChibiOS/HAL: exploiting peripherals
Embedded systems benefit from direct access to integrated peripherals by the processor and the presence of hardware mechanisms that support real-time hardware activities. To provide an example for the previous statement, the processor can efficiently perform activities with peripherals like ADC (Analog-to-Digital Converter) without adding significant overhead. Consequently the latency remains low enough to allow local data processing or data streaming using other peripherals like SPI (Serial Peripheral Interface). While ChibiOS/RT is crucial for managing real-time tasks, it may not be sufficient to build the entire application in scenarios that involve complex interactions with hardware peripherals.
To address this limitation, ChibiOS/HAL comes into play. The HAL (where HAL stand for Hardware Abstraction Layer) provides a standardized API that abstracts the underlying hardware such as SPI, I2C, Timer, ADCs, etc. allowing developers to write code that is portable across different microcontroller platforms. It simplifies cross-platform development by hiding the hardware-specific details and offering a uniform interface to interact with peripherals. With ChibiOS/HAL, developers can focus on writing high-level application code without getting entangled in low-level hardware intricacies.
Can ChibiOS/HAL be used standalone?
Yes, also HAL can be used standalone without the operating system as shown in the demo HAL-STM32F407-DISCOVERY
#include "hal.h"

/*
 * Application entry point.
 */
int main(void) {

  /*
   * System initializations.
   * - HAL initialization, this also initializes the configured device drivers
   *   and performs the board-specific initializations.
   */
  halInit();

  /*
   * Enabling interrupts, initialization done.
   */
  osalSysEnable();

  /*
   * Activates the serial driver 2 using the driver default configuration.
   * PA2(TX) and PA3(RX) are routed to USART2.
   */
  sdStart(&SD2, NULL);
  palSetPadMode(GPIOA, 2, PAL_MODE_ALTERNATE(7));
  palSetPadMode(GPIOA, 3, PAL_MODE_ALTERNATE(7));

  /*
   * Normal main() thread activity, in this demo it just performs
   * a shell respawn upon its termination.
   */
  while (true) {
    chnWriteTimeout(&SD2, (uint8_t *)"Hello World!\r\n", 14, TIME_INFINITE);

    palSetPad(GPIOD, GPIOD_LED3);       /* Orange.  */
    osalThreadSleepMilliseconds(500);
    palClearPad(GPIOD, GPIOD_LED3);     /* Orange.  */
    osalThreadSleepMilliseconds(500);
  }
}
In such a scenario, the application will lose its multithreading capability and function more like a single-loop application. This example code prints a string on the serial driver and also blinks an LED present on the evaluation kit. This is a simple, yet clear, example of an application that performs two separates tasks that could be better served if using an RTOS and therefore a multithreading application.
As it is, this application cannot guarantee determinism under all conditions. The calls to chnWriteTimeout will take an amount of time that depends on the underlying implementation of the Serial Driver and on the hardware: it could return in few cpu cycles or need to wait milliseconds until the transmission of a character of the string “Hello world!\r\n” is completed. This means that there is no guarantee that the LED will blink with a a duty cycle of 50% and a period of 1 second.
The complete codebase of ChibiOS/HAL is situated in the root of the ChibiOS project under the path [chibios_root]\os\hal. The configuration of HAL at the project level is possible through two files: halconf.h and mcuconf.h:
- The
halconf.hfile serves as a generic HAL configuration that enables or disables drivers and customizes their behavior according to the project’s needs. - On the other hand, the
mcuconf.hfile is strictly hardware-related, allowing the configuration of peripheral assignment, interrupt priorities, and DMA streams to match the specific hardware setup of the microcontroller in use.
This ensures that ChibiOS/HAL can be tailored precisely to the underlying hardware platform, making it highly adaptable for various microcontroller configurations.
Interfacing HAL with different RTOS
In the previous chapter, we explored RT and HAL, understanding how they can function independently. One might assume that HAL needs internal calls to the operating system to coexist and work with it. While this is true, HAL is actually quite layered and interfaces with the OS through an Operating System Abstraction Layer (shorten OSAL).
The OSAL is a part of HAL that ensures its independence from the underlying operating system. To put it simply, the OSAL acts as a translator for the software, creating a common language that allows HAL to interact with different operating systems or even function without one (bare-metal environment). Additionally, through OSAL, all dependencies on the OS are centralized in one place.
Let us consider an example to better comprehend this concept. Suppose a HAL driver requires a time break of x milliseconds at a specific point. OSAL provides an API for this called osalThreadSleepMilliseconds(). If HAL is integrated with a RT, this function becomes a redefinition of chThdSleepMilliseconds(), which suspends the thread for the specified time, giving an opportunity for lower priority threads to run during that period. On the other hand, if HAL is running on bare metal, this API sets up a timer for an interrupt and enters a loop until the interrupt is triggered since there are no other threads in this case.
The key is to have multiple implementations of OSAL (one for each supported RTOS and one for bare metal) that share the same API but have different implementations. In the case of ChibiOS\RT, this is achieved with a 1:1 wrapper implemented using macros, ensuring no additional code overhead. By including the appropriate OSAL in the makefile, we can decide how HAL is coupled with the system, as illustrated in the next pictures.


So how to choose if HAL is running on bare-metal or tied with RT?
It is decided through an inclusion line in the makefile of the project. If the project works on bare metal HAL is going to have one of the following inclusions depending on the architecture
# OSAL inclusion for bare metal on an ARM Cortex M architecture
include $(CHIBIOS)/os/hal/osal/os-less/ARMCMx/osal.mk

# OSAL inclusion for bare metal on an AVR architecture
include $(CHIBIOS)/os/hal/osal/os-less/AVR/osal.mk
If the system runs on ChibiOS\RT or ChibiOS\NIL the inclusion will look as follow
# OSAL inclusion for RT or NIL
C:\ChibiStudio\chibios_trunk\os\hal\osal\rt-nil
To run HAL on top of a different bare-metal architecture or with a different operating system, it would be necessary to write a new OSAL starting from an already existing one.
An alternative to RT: ChibiOS/NIL
ChibiOS/RT is a feature-rich RTOS, but it comes with a trade-off of memory footprint and code space usage. This may not be ideal for small microcontrollers where an RTOS is still necessary, but the overhead of ChibiOS/RT is too much to bear. To address this, ChibiOS/NIL was introduced as a fully-fledged RTOS specifically designed for very small devices. In its maximum configuration, NIL occupies less than 1kB of code space.
While NIL certainly deserves a dedicated article to delve into its intricacies further, for now, let me highlight these key aspects of its design and capabilities.
NIL offers a subset of features compared to RT: the main principle is that NIL remains compatible with RT as long as it does not impact the code size. For instance, NIL does not include Integrity checks or Dynamic Threading. Additionally, the threads in NIL are defined at compile time using a special API, which means creating threads at runtime is not possible.
/*
 * Threads creation table, one entry per thread.
 */
THD_TABLE_BEGIN
  THD_TABLE_THREAD(0, "blinker1", waThread1, Thread1, NULL)
  THD_TABLE_THREAD(1, "blinker2", waThread2, Thread2, NULL)
  THD_TABLE_THREAD(2, "hello",    waThread3, Thread3, NULL)
THD_TABLE_END
Another significant difference is that the main in NIL is intended to be the idle thread, and its loop must remain empty.
/*
 * Application entry point.
 */
int main(void) {

  halInit();
  chSysInit();

  /* This is now the idle thread loop, you may perform here a low priority
     task but you must never try to sleep or wait in this loop. Note that
     this tasks runs at the lowest priority level so any instruction added
     here will be executed after all other tasks have been started.*/
  while (true) {
  }
}
The remarkable aspect of NIL is that it represents a genuine subset of RT. This means that if an API is available in NIL, it is identical to its corresponding counterpart in RT. Consequently, the OSAL for both RT and NIL is the same. For those who want a comprehensive comparison between the features of the two systems, I recommend checking out the article RT vs NIL Comparison and Performance on chibios.org.
Similarly to RT, the entire codebase of ChibiOS/NIL is located under the path [chibios_root]\os\nil. It is possible to configure NIL at the project level through the file chconf.h. Despite the same name and some similar configuration options, the configuration file for NIL is different from that of RT.
Expanding the OS capabilities: OSLIB
Both NIL and RT in ChibiOS can have their feature sets expanded by coupling either of them with ChibiOS/LIB. OSLIB serves as an extension library that can be added on top of the kernel, enriching the core RTOS functionalities with higher-level mechanisms.
The features provided by OSLIB are entirely independent of the microcontroller’s architecture and compiler. They are designed to enhance both RT and NIL by introducing higher-level constructs. For instance, OSLIB offers mechanisms for exchanging data between threads, such as Mailboxes or Pipes, as well as various types of memory allocators.
In essence, OSLIB encompasses all the high-level functionalities that can simplify user applications, while remaining agnostic to the specific OS being used. This makes it a versatile toolset for enhancing RT and NIL without introducing dependencies on a particular operating system.
The entire codebase of ChibiOS/LIB is located under the path [chibios_root]\os\oslib
Interfacing external components: EX
While ChibiOS/HAL provides device drivers for numerous internal microcontroller peripherals, applications often need to interface with external devices. However, supporting all available external devices would be an ongoing task. ChibiOS offers support for a few of these devices through a layer that resides on top of HAL: ChibiOS/EX.
EX, short for EXternals, is a collection of complex device drivers primarily focused on supporting MEMS (MicroElectroMechanical Systems) but capable of being extended to a broader domain. EX provides support for various accelerometers, gyroscopes, and e-compasses, utilizing the same object-oriented approach found in ChibiOS/HAL.
One of the remarkable aspects of EX is that it exports interfaces such as generic sensors or generic accelerometers. These interfaces define a base API that each driver can implement accordingly. As a result, applications can be built to rely on these interfaces, making them more independent from the specifics of the driver implementation.
To illustrate this concept, the following code showcases the API of what is known as BaseAccelerometer.
/*
    ChibiOS - Copyright (C) 2006..2018 Rocco Marco Guglielmi

    Licensed under the Apache License, Version 2.0 (the "License");
    you may not use this file except in compliance with the License.
    You may obtain a copy of the License at

        http://www.apache.org/licenses/LICENSE-2.0

    Unless required by applicable law or agreed to in writing, software
    distributed under the License is distributed on an "AS IS" BASIS,
    WITHOUT WARRANTIES OR CONDITIONS OF ANY KIND, either express or implied.
    See the License for the specific language governing permissions and
    limitations under the License.
*/

/**
 * @file    ex_accelerometer.h
 * @brief   Generic accelerometer interface header.
 *
 * @addtogroup EX_ACCELEROMETER
 * @{
 */

#ifndef EX_ACCELEROMETER_H
#define EX_ACCELEROMETER_H

#include "ex_sensors.h"

/*===========================================================================*/
/* Driver constants.                                                         */
/*===========================================================================*/

/*===========================================================================*/
/* Driver pre-compile time settings.                                         */
/*===========================================================================*/

/*===========================================================================*/
/* Derived constants and error checks.                                       */
/*===========================================================================*/

/*===========================================================================*/
/* Driver data structures and types.                                         */
/*===========================================================================*/

/**
 * @brief   BaseAccelerometer specific methods.
 */
#define _base_accelerometer_methods_alone                                   \
  /* Invoke the set bias procedure.*/                                       \
  msg_t (*set_bias)(void *instance, float biases[]);                        \
  /* Remove bias stored data.*/                                             \
  msg_t (*reset_bias)(void *instance);                                      \
  /* Invoke the set sensitivity procedure.*/                                \
  msg_t (*set_sensitivity)(void *instance, float sensitivities[]);          \
  /* Restore sensitivity stored data to default.*/                          \
  msg_t (*reset_sensitivity)(void *instance);

/**
 * @brief   BaseAccelerometer specific methods with inherited ones.
 */
#define _base_accelerometer_methods                                         \
  _base_sensor_methods                                                      \
  _base_accelerometer_methods_alone

/**
 * @brief   @p BaseAccelerometer virtual methods table.
 */
struct BaseAccelerometerVMT {
  _base_accelerometer_methods
};

/**
 * @brief   @p BaseAccelerometer specific data.
 */
#define _base_accelerometer_data                                            \
  _base_sensor_data

/**
 * @extends BaseSensor
 *
 * @brief   Base accelerometer class.
 * @details This class represents a generic a generic accelerometer.
 */
typedef struct {
  /** @brief Virtual Methods Table.*/
  const struct BaseAccelerometerVMT *vmt;
  _base_accelerometer_data
} BaseAccelerometer;

/*===========================================================================*/
/* Driver macros.                                                            */
/*===========================================================================*/

/**
 * @name    Macro Functions (BaseAccelerometer)
 * @{
 */
/**
 * @brief   Accelerometer get axes number.
 *
 * @param[in] ip        pointer to a @p BaseAccelerometer class.
 * @return              The number of axes of the BaseAccelerometer
 *
 * @api
 */
#define accelerometerGetAxesNumber(ip)                                      \
        (ip)->vmt->get_channels_number(ip)

/**
 * @brief   Accelerometer read raw data.
 *
 * @param[in] ip        pointer to a @p BaseAccelerometer class.
 * @param[in] dp        pointer to a data array.
 *
 * @return              The operation status.
 * @retval MSG_OK       if the function succeeded.
 * @retval MSG_RESET    if one or more errors occurred.
 *
 * @api
 */
#define accelerometerReadRaw(ip, dp)                                        \
        (ip)->vmt->read_raw(ip, dp)

/**
 * @brief   Accelerometer read cooked data.
 *
 * @param[in] ip        pointer to a @p BaseAccelerometer class.
 * @param[in] dp        pointer to a data array.
 *
 * @return              The operation status.
 * @retval MSG_OK       if the function succeeded.
 * @retval MSG_RESET    if one or more errors occurred.
 *
 * @api
 */
#define accelerometerReadCooked(ip, dp)                                     \
        (ip)->vmt->read_cooked(ip, dp)

/**
 * @brief   Updates accelerometer bias data from received buffer.
 * @note    The bias buffer must have the same length of the
 *          the accelerometer axes number.
 *
 *
 * @param[in] ip        pointer to a @p BaseAccelerometer class.
 * @param[in] bp        pointer to a buffer of bias values.
 *
 * @return              The operation status.
 * @retval MSG_OK       if the function succeeded.
 * @retval MSG_RESET    if one or more errors occurred.
 *
 * @api
 */
#define accelerometerSetBias(ip, bp)                                        \
        (ip)->vmt->set_bias(ip, bp)

/**
 * @brief   Reset accelerometer bias data restoring it to zero.
 *
 * @param[in] ip        pointer to a @p BaseAccelerometer class.
 *
 * @return              The operation status.
 * @retval MSG_OK       if the function succeeded.
 * @retval MSG_RESET    if one or more errors occurred.
 *
 * @api
 */
#define accelerometerResetBias(ip)                                          \
        (ip)->vmt->reset_bias(ip)

/**
 * @brief   Updates accelerometer sensitivity data from received buffer.
 * @note    The sensitivity buffer must have the same length of the
 *          the accelerometer axes number.
 *
 * @param[in] ip        pointer to a @p BaseAccelerometer class.
 * @param[in] sp        pointer to a buffer of sensitivity values.
 *
 * @return              The operation status.
 * @retval MSG_OK       if the function succeeded.
 * @retval MSG_RESET    if one or more errors occurred.
 *
 * @api
 */
#define accelerometerSetSensitivity(ip, sp)                                 \
        (ip)->vmt->set_sensitivity(ip, sp)

/**
 * @brief   Reset accelerometer sensitivity data restoring it to its typical
 *          value.
 *
 * @param[in] ip        pointer to a @p BaseAccelerometer class.
 *
 * @return              The operation status.
 * @retval MSG_OK       if the function succeeded.
 * @retval MSG_RESET    if one or more errors occurred.
 *
 * @api
 */
#define accelerometerResetSensitivity(ip)                                   \
        (ip)->vmt->reset_sensitivity(ip)
/** @} */

/*===========================================================================*/
/* External declarations.                                                    */
/*===========================================================================*/

#ifdef __cplusplus
extern "C" {
#endif

#ifdef __cplusplus
}
#endif

#endif /* EX_ACCELEROMETER_H */

/** @} */
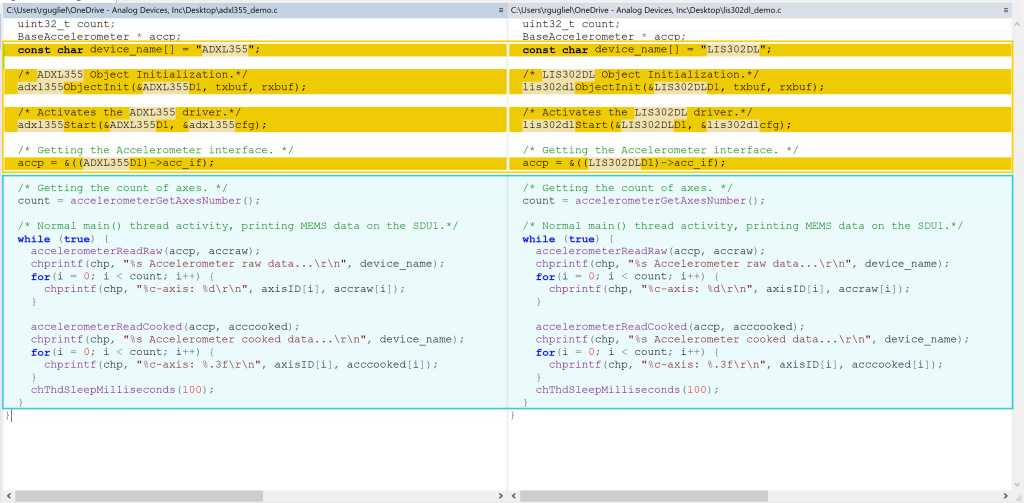
The provided screenshot presents a side-by-side comparison of two demos featuring different accelerometers supported by EX. Aside of the variance in object initialization and differences in the configuration structure for the two accelerometers, the entire application exhibit a 1:1 overlap in its syntax.
Reducing the effort of first run: ChibiStudio
The typical challenge with embedded systems projects is that they involve a collection of assembly and C files. Getting to the point of flashing and running the project can be a daunting task, requiring the setup and configuration of multiple tools, which might take several hours or even days without proper guidance. Furthermore, bootloading the firmware onto the microcontroller and enabling debugging capabilities involves configuring additional tools such a GDB Server and potentially an Integrated Development Environment (IDE) for a user-friendly debugging experience. This complexity can be discouraging, leading some to abandon the experiment altogether.
So there it comes ChibiStudio, a collection of pre-configured open-source tools designed to simplify the process. With ChibiStudio, all you need to do is unzip the package and run it. It is a product of the ChibiOS project and is extensively used by the community for software development of the project itself as well as application building. However, it is essential to distinguish ChibiStudio from ChibiOS itself: ChibiStudio is the toolchain, while ChibiOS is the code base.
A fun fact about ChibiStudio is that me, the author of this article, I am responsible for building and releasing it to the community. Another fun fact, I am not very good in memorizing mechanical steps. So, to streamline the process, I have created an article on how to build ChibiStudio from scratch, which is continually updated whenever a new ChibiStudio version is required. Curious about this task? There you go: Assembling ChibiStudio from scratch
For those reading for the first time about ChibiOS and interested in exploring it, my suggestion is to get an Analog Devices SDP-K1 and check out Getting started with ChibiOS using the SDP-K1.
Be the first to reply at Is ChibiOS an RTOS or a HAL? Understanding the full picture