
What is the difference between a bootloader and a debugger?
Introduction
Debugging can be a challenging task for many new developers and engineering students. In my experience leading seminars and hands-on sessions, I have found that one of the most common points of confusion is the distinction between a bootloader and an on-chip debugger. Both of these tools are used to test the functional behavior of firmware, but they serve different purposes. In this article, we will explore the differences between bootloaders and on-chip debuggers, and why understanding these distinctions is crucial for effective debugging.
Bootloader and on-chip debugger
The bootloader
A bootloader is a specialized software that facilitates the transfer of firmware from a host device, usually a PC, into the primary memory of a microcontroller. Once the bootloading process concludes, the microcontroller runs the newly loaded code and disconnects from the host.
The diagram below illustrates the sequence of events during the bootloading process. In this particular instance, the microcontroller features a Boot ROM – essentially, software embedded within the silicon of the microcontroller – which initializes the system and determines whether to initiate the bootloader or proceed to the user application. This decision typically hinges on the status of specific hardware pins, known as boot pins.
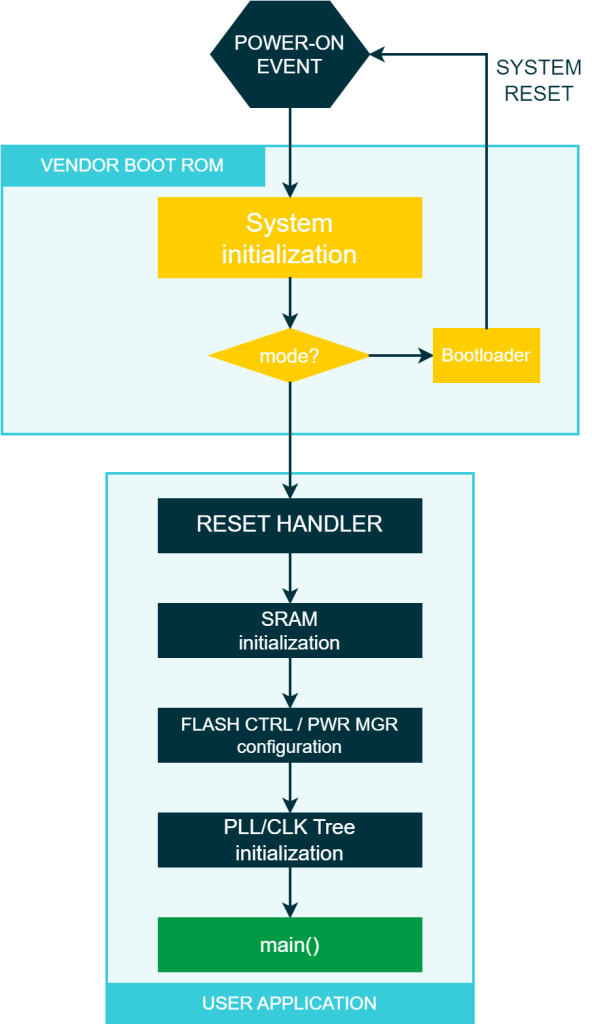
If the system enters the bootloader, a communication interface such as UART, SPI, or I2C is utilized to upload the new firmware to the microcontroller’s flash memory. Modern evaluation kits equipped with bootloaders often use USB to UART bridges, like the FTDI chip, to simplify the connection to a PC. This allows users to virtually access the UART employed for bootloading when connecting the eval kit to the PC.
After the firmware has been bootloader in the memory, the system is rebooted and the pins are configured to bypass the bootloader. In some cases, triggering the bootloader may necessitate a physical action from the user, such as moving a jumper or holding down a button during startup.
Functional testing
Bootloaders have historically served as a cost-effective solution when a dedicated debugger is unavailable. This was especially true in the early days of embedded systems when commercial debuggers were costly and hard to come by.
It is crucial, however, to acknowledge that bootloaders do not provide debugging features. Consequently, when only a bootloader is available, functional testing is typically employed to verify code behavior. For instance, a developer might insert extra instructions unrelated to the user application, such as activating an LED when certain conditions are met, to confirm that the code is functioning as intended. The issue with functional testing is that modifying the code for testing purposes can sometimes be counterproductive. Indeed, adding extra instructions to the code alters its timing, and as a result, any time-related bugs become much more difficult to detect.
It is worth noting that the indirect relationship between bootloaders and debugging can occasionally lead to confusion. Although bootloaders are useful tools for loading firmware onto microcontrollers, they do not offer any debugging capabilities like dedicated on-chip debuggers. As a result, this limitation forces users to rely on functional testing as their primary debugging tool.
The on-chip debugger
On-chip debuggers are powerful tools for monitoring the behavior of a microcontroller in real-time. The microcontroller being probed by the debugger is often referred to as the Target.
A primary capability of an on-chip debugger is its ability to interact with a microcontroller’s flash memory. This enables developers to flash or erase firmware without using a bootloader, resulting in a more efficient process. Furthermore, a debugger can interact with the microcontroller’s CPU and its registers, providing a wide range of debugging capabilities. These include the ability to pause and resume code execution at any moment, set breakpoints at specific addresses in the code, and execute code instruction by instruction.
Another important feature of on-chip debuggers is their ability to interact with the microcontroller’s RAM. This encompasses the capability to set watchpoints on specific memory addresses and read/write static and automatic variables. Consequently, on-chip debuggers can access memory-mapped registers, such as MCU peripherals like TIMs, SPIs, ADCs, UARTs, and more.
To leverage these debugging features, the microcontroller must be designed to support them. This typically necessitates a dedicated piece of silicon within the chip that interfaces with the external world through a standard communication bus. For instance, the ARM Cortex-M architecture specifies a debugging interface called ADI, or ARM Debug Interface. This cell can be interfaced with a host, such as a PC, through a JTAG/SWD probe like the CMSIS DAP, STLink, Segger JLink, or Lauterbach PowerDebug.
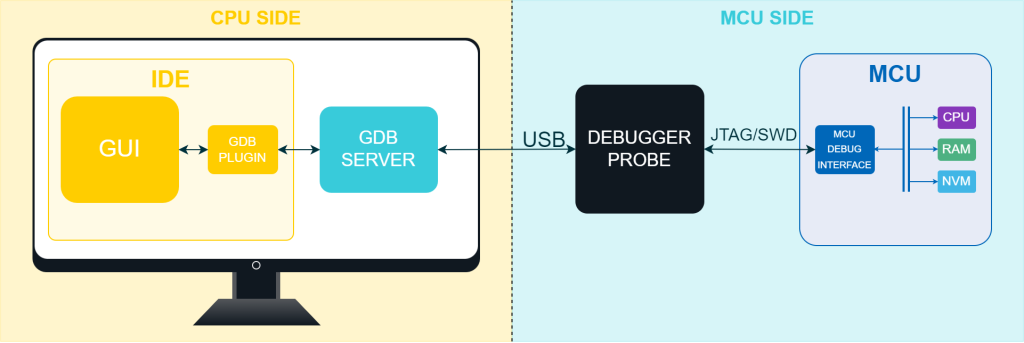
Many IDEs can be configured to integrate debugging features. For example, Eclipse can be extended with a GNU Debugger plugin that provides an interface between the Eclipse engine and an external GDB Server like OpenOCD. This allows developers to place breakpoints, execute code step by step, explore memory, and more, all within the Eclipse GUI.
Conclusion
On-chip debuggers offer powerful debugging capabilities, but they do require additional hardware and IDE configurations to become effective. Once configured, however, an on-chip debugger can be an invaluable tool for identifying and resolving functional issues, thereby reducing the development effort required.
In fact, many development kits based on ARM Cortex MCUs come with an included debugger, and numerous IDEs are preconfigured to provide comprehensive debugging capabilities. For instance, if you start working with ChibiOS using the SDP-K1, you will use ChibiStudio, which is already configured to leverage the debugging capabilities of the CMSIS-DAP hosted on the SDP-K1.
It’s worth noting that on-chip debuggers are particularly beneficial when starting development from scratch, such as when implementing startup routines and the reset handler. By providing real-time insight into the firmware’s behavior, on-chip debuggers enable developers to identify and address issues more efficiently and effectively.
While the debugger necessitates additional hardware and specific configurations within the IDE to become effective, it can be a game-changer for catching and solving functional issues, significantly reducing the effort required in development. This is particularly important when starting development from scratch, such as when implementing startup routines and the reset handler.
So, if you have experience with Arduino and are accustomed to bootloader and LED-based debugging, it’s worth investing some time in learning how to use on-chip debuggers and run-time debugging.
Great article!
Thanks, Kristof
very clear article
Great article