
Getting started with ChibiOS using the SDP-K1
In this article, we will delve into the world of ChibiOS and explore how to take the first steps with the open-source project using the Analog Devices EVAL-SDP-CK1Z, also known as the SDP-K1 controller board. ChibiOS is a comprehensive open-source project that centers around ChibiOS/RT, a Real-Time Operating System (RTOS) that provides a wide range of utilities for implementing various applications, and ChibiOS/HAL, a set of device drivers that enable the use of multiple MCU peripherals, such as GPIO, UART, SPI, and I2C.
Learning how to use ChibiOS is incredibly beneficial, as it allows for the implementation of a diverse range of applications, from simple educational projects to commercial products. Additionally, ChibiOS/HAL excels in making the application independent of the MCU in use. This means that it is possible to port an application from one development board to another in just a matter of minutes.
The choice of the SDP-K1 controller board was mainly driven by the combination of a well-designed STM32F469 microcontroller and the ADI 120-pin connector that allows for interfacing with hundreds of Analog Devices evaluation boards.
For those new to the world of microcontrollers, our article Microcontroller 101 will provide answers to common questions such as “what is a microcontroller,” “why use one,” and “how do they work”.
Hardware documentation
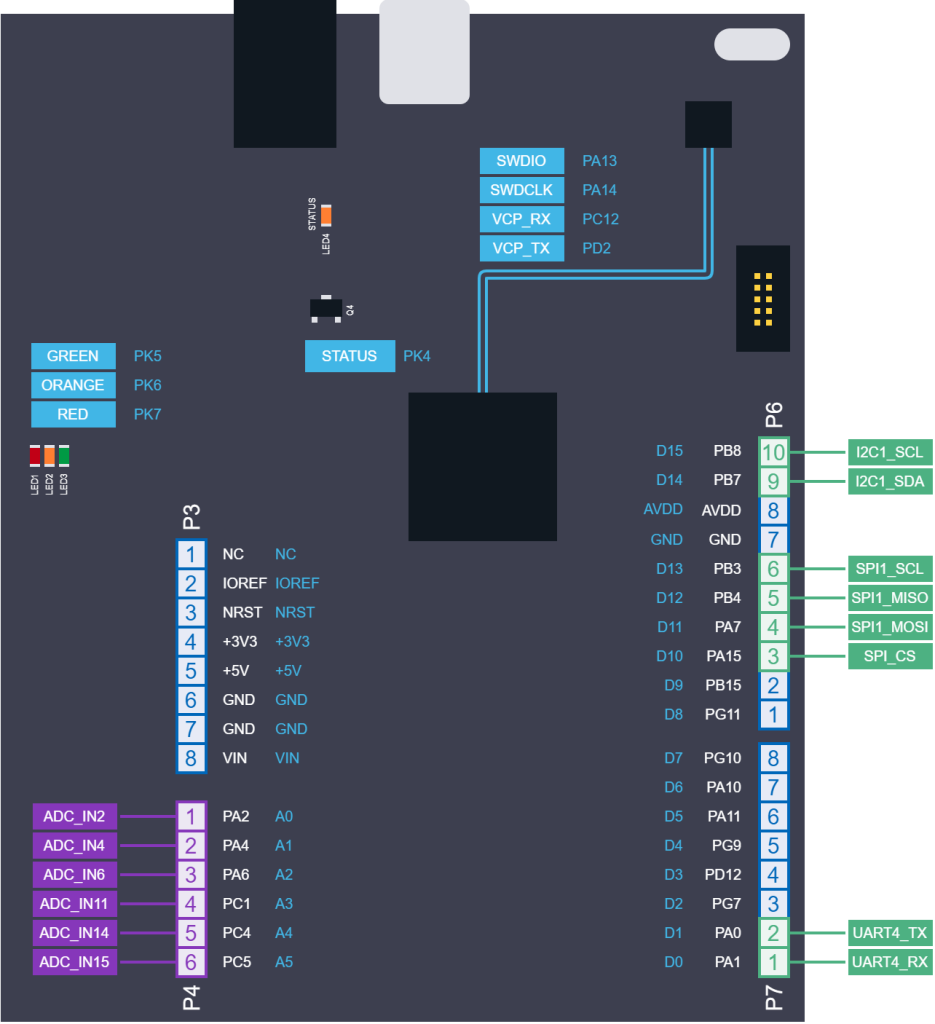
Since we’ll be working with this board extensively, it’s important to gather all the necessary documentation for both the board and microcontroller and keep it easily accessible. Here are the documents typically needed:
- The datasheet and reference manual for the microcontroller being used (STM32F469NI)
- The Schematic of the SDP-K1 Rev E board
- Additionally, a useful reference is the drawing we created that maps out each pin of the Arduino Connector on the SDP-K1 to the corresponding GPIO of the STM32F469.
Setting up the toolchain
The initial step in getting started with ChibiOS is setting up the toolchain. There are two options available for this: assemble your toolchain from scratch by downloading and configuring each component individually or download ChibiStudio, a preassembled toolchain in a single zip file. To do so:
- Get the last release of ChibiStudio from the Official page of ChibiStudio
- Extract the files under C:\ using 7zip
- Copy the link “Chibi Studio GCC x.x” on the desktop and use it to launch the toolchain.
For more detailed instructions or troubleshooting assistance, refer to the guide on
First flash and run
Upon the initial launch of ChibiStudio, the toolchain will appear as shown in the image.
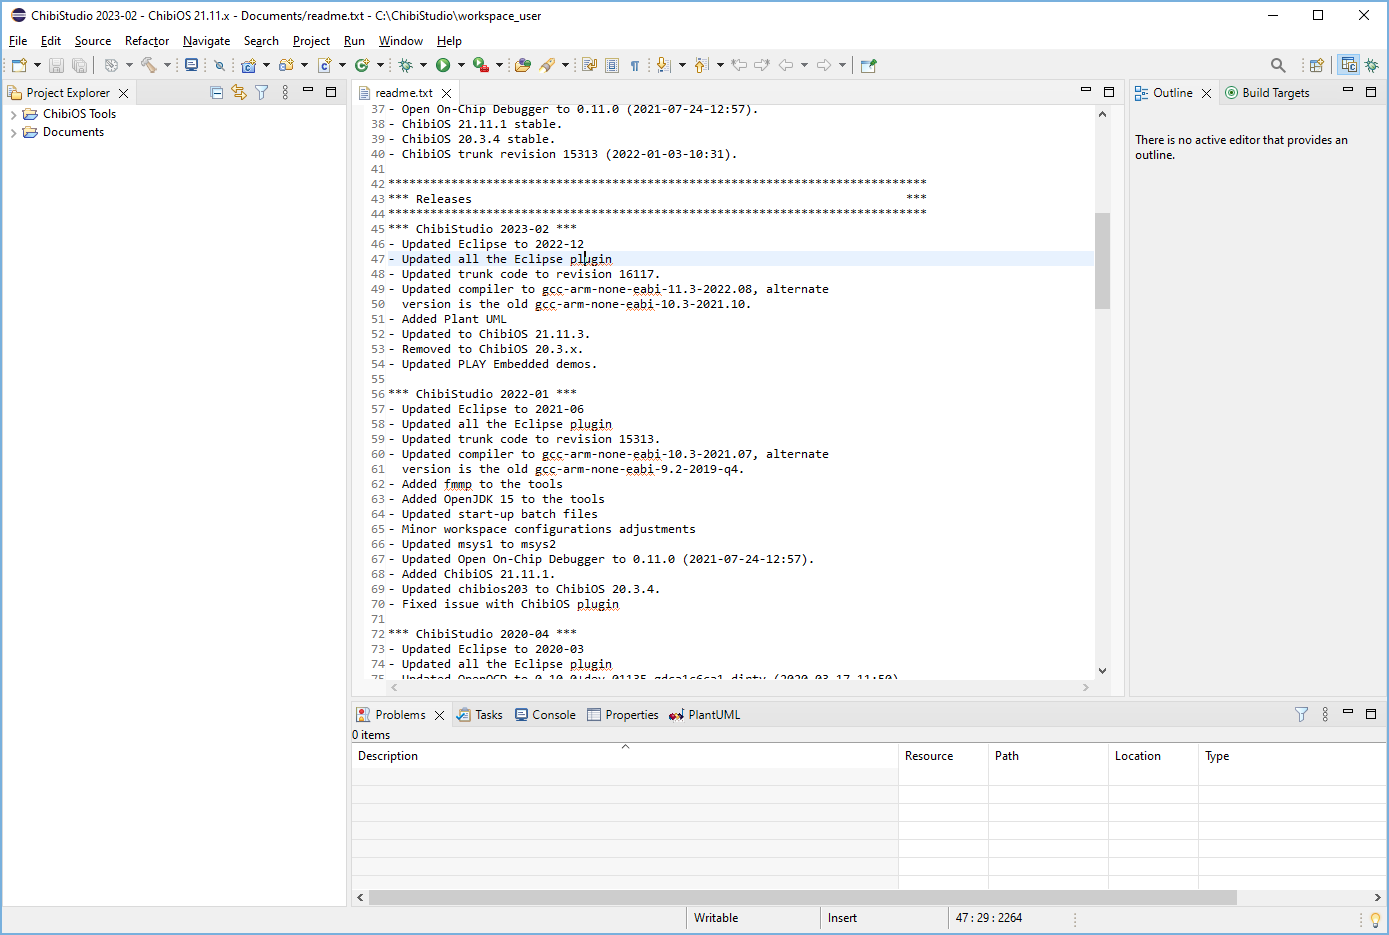
The title bar in the image indicates that the version of ChibiStudio being used is 2022-01, the version of ChibiOS is 21.11.x and the active workspace is “Workspace User.” One of the first tasks that may be desired is to import a project for the SDP-K1, which can be found at C:\ChibiStudio\chibios2111\demos\STM32\RT-STM32F469I-EVAL-SDP-CK1Z. Instructions on how to import the project can be found (here).
A few remarks:
- ChibiStudio offers various versions of ChibiOS and allows users to switch between them.
- The current workspace is using ChibiOS 21.11.x, and projects should be selected from the folder C:\ChibiStudio\chibios2111.
- The demos folder, located at C:\ChibiStudio\chibiosxxx\demos, contains a variety of demos for different microcontrollers and boards.
- The name RT-STM32F469I-EVAL-SDP-CK1Z indicates that the demo uses ChibiOS\RT configured for the STM32F469I microcontroller on the EVAL-SDP-CK1Z board.
After importing the project, you must build it, then flash the firmware to the SDP-K1 and run it. The steps to do this are outlined in the following How-tos:
How to build a project in ChibiStudio
How to Flash & Run a project in ChibiStudio
Verifying the success of ChibiStudio’s setup
The default demo for the SDP-K1 demo performs two tasks:
- blink the board LEDs following a specific sequence
- launch the test suite if the pin A0 of the SKD-K1 is grounded and output the results on the CMSIS-DAP serial
LED blinker
The most effective way to confirm that the setup has been completed successfully is to flash and run the firmware, resume the execution, and ensure that the board’s LEDs blink in the sequence shown in the accompanying video.
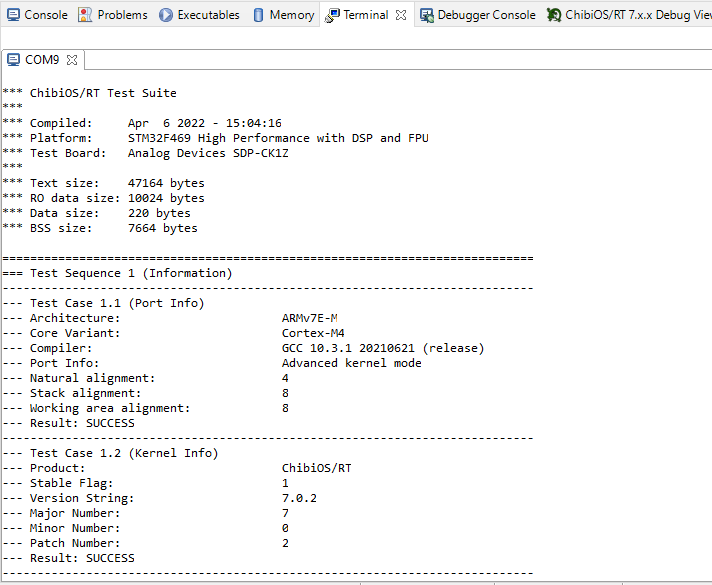
Test suite
The ChibiOS Test Suite runs tests related to the operating system and displays the results on the CMSIS-DAP serial port. It can be used to verify that the operating system functions correctly on the board or to confirm that the correct firmware has been loaded onto it.
To view the output of the Test Suite, the CMSIS-DAP serial port must be identified. Note that Windows assigns the serial port and it may change if the board is connected to a different USB hub. It’s recommended to check the assigned serial port for the DAP. To do so, open the Device Manager and navigate to the Ports (COM & LPT) section. Check the list when the SDP-K1 is connected and disconnected to identify the COM port assigned to the CMSIS DAP.


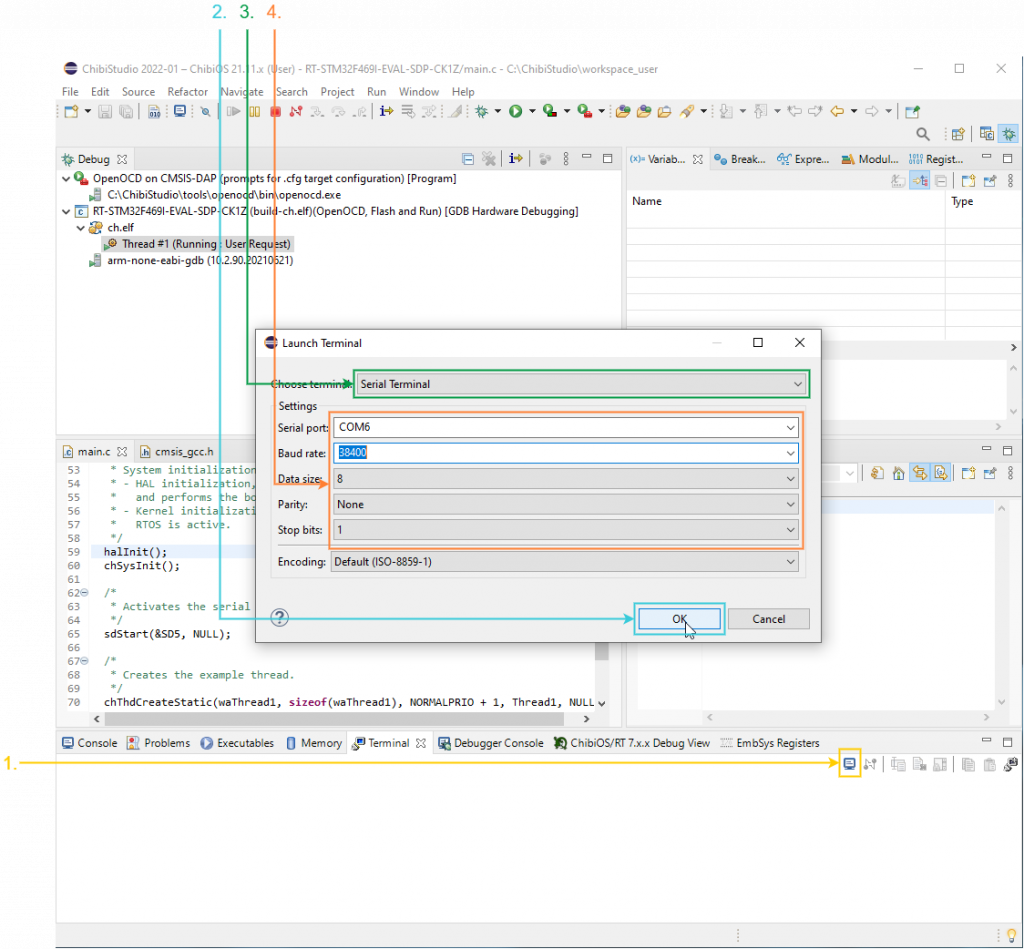
At this point, from the debug perspective of ChibiStudio, we have to open the Terminal. To do so:
- Click on the Terminal tab and click on the Open Terminal button
- Choose the Serial Terminal
- Configure it for using the CMSIS DAP COM port, 38400, 8-bit, no parity 1 Stop bit
- Choose ok
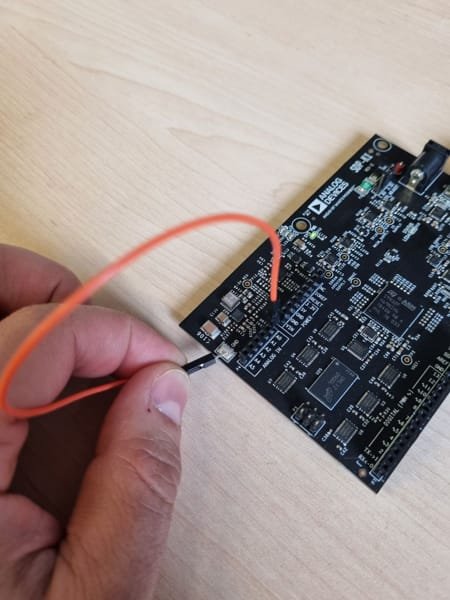
At this point with a jumper cable short A0 to GND for more than half a second and you will see the output of the Test Suite in the terminal window.
Next steps
In conclusion, it is recommended not to alter the default project as it can be used as a template in the future. A useful next step would be to duplicate the initial project and experiment with modifying the LED blinking thread to observe the effects on blink timing.
Familiarizing oneself with the ChibiStudio reading ChibiStudio Overview can also be beneficial. If you want to skip this overview then the suggested next article will be Mastering multithreading with ChibiOS: a beginner’s guide where the default demo will be analyzed in detail.
Hi,
I’m having trouble viewing the list of running threads using the ‘RT-STM32G474RE-NUCLEO64’ demo.
There should be two threads, but I can only see thread 1 (main()).
After entering debug mode, the console outputs the following message:
”
Error: ChibiOS registry integrity check failed, double linked list violation
Info : Only showing current execution because of a broken ChibiOS thread registry.
“
Note: I tried enabling the debugger flag “Force Thread List Update”, but the issue persists.
Has anyone encountered a similar issue or have any suggestions on how to fix it?
Thanks
Here are some details about my Workbench setup :
– Open On-Chip Debugger version: 0.11.0
– Chibi Studio GCC version: 11.3.1
– Demo directory: C:\ChibiStudio\chibios2111\demos\STM32\RT-STM32G474RE-NUCLEO64
Hi Martin,
never saw anything like this. I would suggest you to ask this question directly on the ChibiOS Forum, Giovanni mostlikely has hints (forum.chibios.org)
Thanks for the reply, Rocco. In the end, I solved it by reinstalling OpenOCD.