
Microcontrollers 101
In this article, we will provide an introduction to microcontrollers, which are small computers on a single integrated circuit that are specifically designed to control various devices or systems. We will explore the key differences between microcontrollers and traditional CPUs and discuss the reasons why microcontrollers are becoming increasingly popular. We will also cover the software development process for programming microcontrollers and provide an overview of the minimum tools required to get started. Finally, we will provide a link to an article that demonstrates how to set up a toolchain and take your first steps in programming microcontrollers.
What is a microcontroller?
A Microcontroller unit, or MCU, is a small computer on a single integrated circuit that typically includes one or more CPUs, RAM and Flash memory, and a variety of low-level I/O peripherals such as GPIO, UART, SPI, I2C, and more. Because of its compact size and self-contained nature, an MCU is often referred to as an Embedded System.
Difference between CPU and MCU
A Central Processing Unit (CPU) is the main chip in a computer that is responsible for carrying out all tasks. These tasks are provided in the form of instructions that are described in the software that runs on that CPU.
A CPU is designed to perform large and complex operations such as data elaboration or graphic processing. These devices operate at a clock speed of GHz and are typically coupled with fast RAMs that operate at the same speed and have a size in the order of GBs. As the RAM cannot retain data when powered off, the system typically includes non-volatile memories (NVM) such as an SDD with a size in the range of hundreds of GBs.
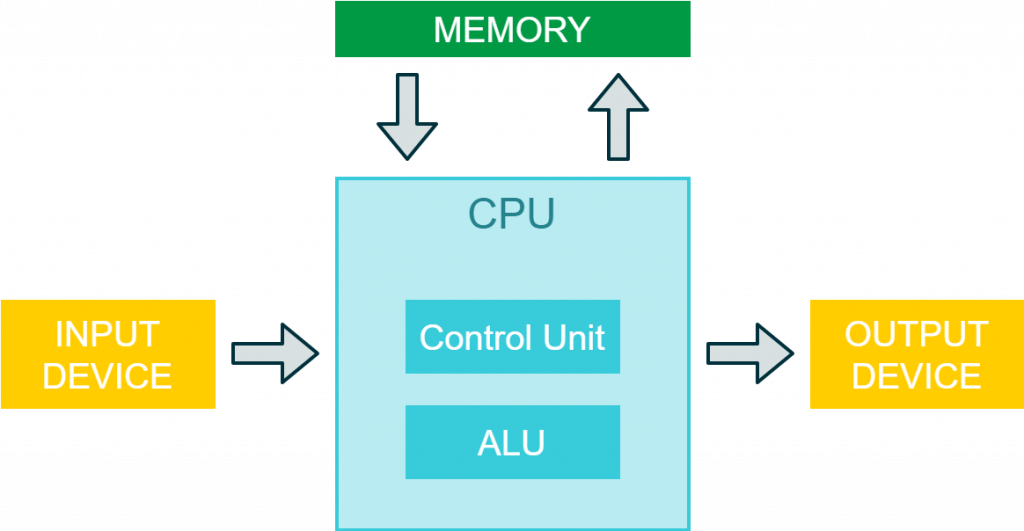
In contrast, a MicroController Unit (MCU) is designed to be more power-efficient and to perform real-time operations. These devices typically include a CPU that operates at a clock speed of dozens of MHz, coupled with a smaller amount of RAM in the range of MBs, and non-volatile memory with a size that can range from tens to hundreds of MBs.
The peripherals of an MCU are also different from those of a traditional computer system and are typically converters, signal generators, or communication peripherals that are more suitable for interacting with the hardware that an MCU is designed to control. In general, an MCU is optimized for simpler and more specialized tasks, making it more efficient and cost-effective for applications that require specific functions.
In summary, MCUs differ from CPUs in that they are optimized for specific tasks that require real-time processing, low power consumption, and minimal external components. They achieve this optimization by including specialized hardware components and peripherals that are designed to interface with the specific devices or systems that an MCU is intended to control. Additionally, MCUs often require less space than a traditional computer system, making them ideal for small or compact designs. With these advantages, MCUs are increasingly being used in a variety of applications, including automotive, consumer electronics, and industrial control systems, where their efficiency, cost-effectiveness, and flexibility make them an attractive option.
Why microcontrollers?
Microcontrollers are designed to interface with a wide range of hardware, including motor controllers, sensors, small displays, and radio frequency transceivers. They are often used in applications where high computational power is not a requirement, as they can operate with a small amount of power, such as that provided by a coin battery. In addition to being energy-efficient, microcontrollers are very easy to integrate into small devices, making them a popular choice for highly integrated devices such as wearables.
One of the key advantages of microcontrollers is that their software development is accessible and straightforward, due to the availability of development kits and open-source software. Additionally, there are a wide variety of controllers, sensors, and displays specifically designed to be interfaced with microcontrollers, making it easy to put together building blocks and write embedded software to create smart devices. This flexibility and ease of use has led to microcontrollers being used in a wide variety of applications, from smartwatches to coffee machines to car trunks, and beyond. Overall, the simplicity and versatility of microcontrollers make them an ideal choice for many embedded systems and IoT applications.
The development process
The process of writing and running firmware on a microcontroller can be broken down into several key steps:
- Outline a series of instructions in a programming language.
- Build the code and check for syntax errors. The result of this operation will be a binary file, also known as firmware or FW.
- Flash the firmware onto the MCU memory.
- Run the firmware, detect and debug any unexpected behavior.
- Amend the code as needed.
- Build the code again.
- …
The development process continues until the firmware fulfills the original requirements, at which point the process is complete.
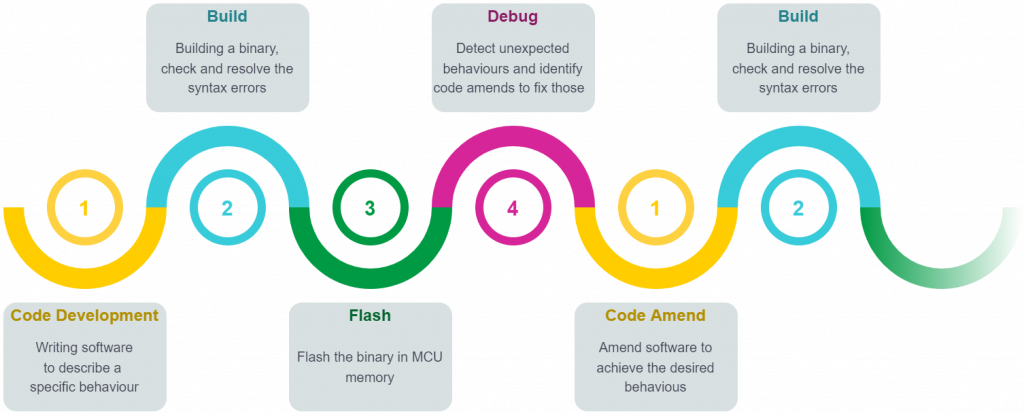
During the development phase, it is common to repeat the firmware development process multiple times in order to achieve the expected behavior. This involves making changes to the code, re-building it, flashing it onto the MCU, and debugging it again.
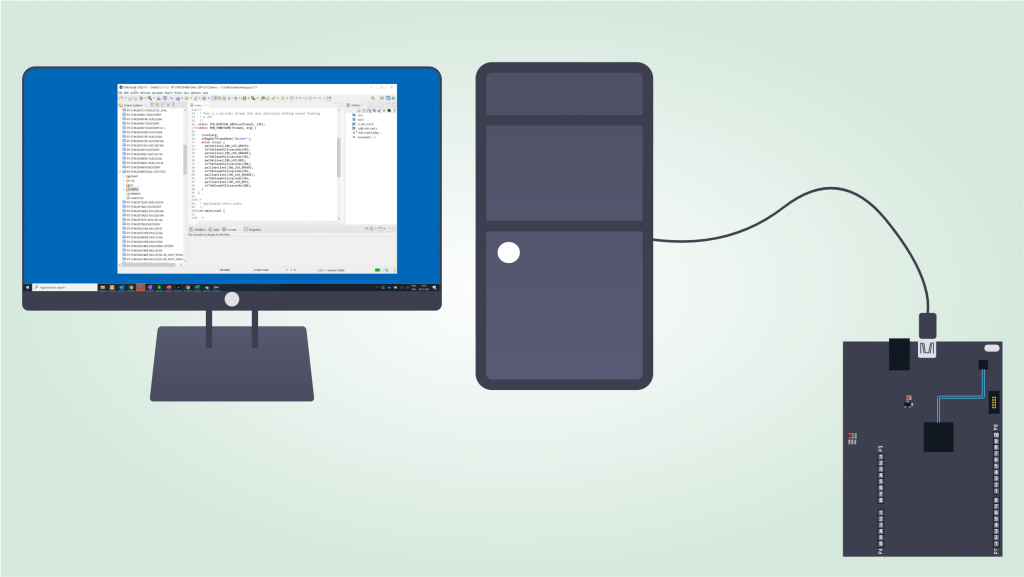
The firmware development process for a microcontroller typically involves two entities: a PC running an Integrated Development Environment (IDE) and a development board hosting the MCU. These two entities interact closely during the development phase, with the IDE being used to write, build, and debug the firmware, and the development board being used to flash and run the firmware. Once the development process is complete, the MCU can be powered by an external source and run independently from the PC.
Dev kits and Toolchains
The MCU itself is a single chip that typically needs to be soldered onto a custom PCB. However, to speed up the evaluation and development phases, MCU manufacturers offer Development Kits. These kits are essentially a single PCB that hosts the MCU, a USB debugger/bootloader, a power section that typically sources power from the USB, and some LED, buttons, connectors, and peripherals that can be used by the user via software.
Professional kits often come with a debugger that serves as a bootloader, which can be very useful as a debugger provides also additional features that speed up the debugging process. To develop firmware for an MCU, a minimum set of tools is required, which are often grouped together in what is known as a Toolchain. The Toolchain typically includes:
- Specific software libraries designed for the MCU in use
- A cross-compiler capable of building binaries suitable for the architecture of the MCU in use
- A bootloader interface or optionally a software debug interface that puts the MCU in communication with a PC during the debugging phase
- Some sort of IDE which facilitates the code development and offers a graphical user interface for debugging.
By providing these tools and resources, manufacturers can make it easier and more efficient for developers to create software for their MCUs, accelerating the time-to-market for new products and solutions.
Example: Analog Devices SDP-K1 + ChibiStudio
As an example, let’s consider the scenario of developing using the SDP-K1 with Chibistudio, and take a closer look at the components on the dev kit and toolchain.
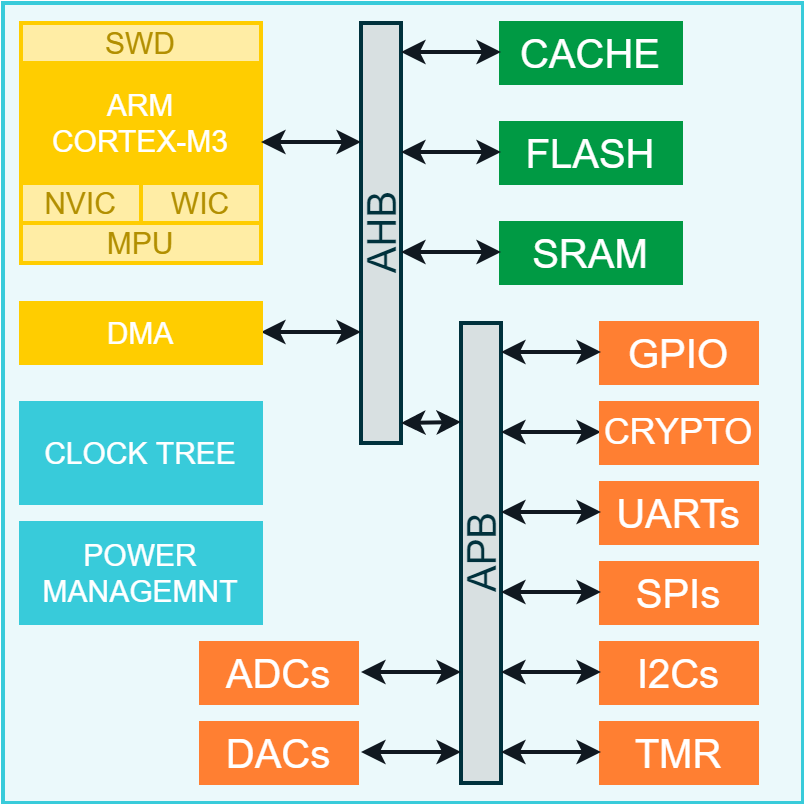
The SDP-K1 is a dev kit from Analog Devices that hosts an STM32F469 microcontroller, specifically an ARM Cortex M4 from STMicroelectronics. The dev kit also includes a USB debugger in the form of a CMSIS Dap Link, which offers both a virtual COM port and bootloader capability. Power is supplied via the debugger’s USB, and the dev kit also includes four programmable LEDs, an Arduino Uno connector, and an ADI 120-pin connector.
ChibiStudio is a free and open-source toolchain that includes all the necessary tools to start developing with the SDP-K1 right away, at no cost. The ChibiStudio toolchain includes:
- ChibiOS, a set of libraries that support many microcontrollers and peripherals. ChibiOS also offers a multithreading Real-Time Operating System (RTOS) that can be very useful in certain applications.
- A cross-compiler, specifically GCC for ARM.
- A debugger software interface in the form of OpenOCD, a GDB server that puts the MCU in communication with the PC during the debugging phase.
- A bootloader interface or optionally a software debug interface that puts the MCU in communication with a PC during the debugging phase.
- An IDE in the form of Eclipse for C/C++.
By combining the SDP-K1 dev kit with the ChibiStudio toolchain, developers can get started with firmware development for the STM32F469 MCU right away, with a wide range of tools and resources at their disposal.
How to start
If you’re interested in learning more about microcontrollers, there is a wealth of resources available to you. From online tutorials and forums to books and training courses, there are countless ways to get started with MCU development.
This blog is one of those resources and probably the best way to get started is to read our How to Start guide, which provides an overview of the blog and the initial articles and resources to focus on.
Whether you’re a student, hobbyist, or professional developer, there has never been a better time to start learning about microcontrollers. With the right tools and resources, you can unlock a world of possibilities and begin creating your own innovative solutions for a wide range of applications.
Be the first to reply at Microcontrollers 101